Updated August 2024
This tutorial assumes you have a rendered website on your local machine (perhaps from following this post on how to create a Quarto website) and would like to host that website publicly on GitHub.
Step 1: Get Git and GCM
Git is a free, open source, and distributed version control system. Practically, what this means is that you can use Git to track a history of your work on a project, to “back up” your project on a cloud-based Git repository service like GitHub, and/or to collaborate simultaneously but asynchronously with others on a project. It is the the most popular VCS; anyone who writes any amount of code should be familiar with the basics of Git.
First, check to see if you have Git already installed. On Windows, this amounts to checking to see if you have an application called Git-Bash accessible from the Start Menu. On Mac or Linux, run git --version in the Terminal. If a version number is returned, you have Git.
Whether or not you have Git, follow the remaining instructions to install the Git Credential Manager (GCM), which substantially improves the process of authenticating your computer with GitHub when you push local files to your remote respository.
On Windows, go to git.scm.com and download “Git for Windows” which is a bundle of software that includes Git, the Git-Bash Terminal, and the Git Credential Manager.
On Mac, I recommend using Homebrew, which is a package manager (very loosely, it’s like an App Store for your Terminal). Unlike the Windows instructions just above, this is a multi-step process.
- Check to see if you have Homebrew installed by running
brew --versionin the Terminal. If a version number is returned, you do. If not, visit https://brew.sh, copy the line of code at the top of their webpage, and paste/run that line of code in your Terminal. It should look something like:
Terminal
/bin/bash -c "$(curl -fsSL https://raw.githubusercontent.com/Homebrew/install/HEAD/install.sh)"Follow along at the Terminal, as you may need to enter your computer log-in password and/or indicate you agree to various terms or licenses. Note that when you type your password at the command line in the terminal, the cursor will not move. This is for security and privacy reasons. But rest assured that your input is being received. So type out your password when/where necessary and hit enter.
- Next, install Git by running
brew install gitat the Terminal. If you receive an error like “zsh: command not found: brew” run the following line of code in the Terminal and then try again to install Git. (What’s going on here is that Homebrew makes its location known to the Bash shell but not to Zsh, which is the newer and now-default shell on MacOS, so the following line of code tells Zsh where to look for Homebrew.)
Terminal
export PATH="/opt/homebrew/bin:$PATH" >> ~/.zshrc- With Git successfully installed, next install the Git Credential Manager by running the following at the terminal. As before, follow along at the Terminal, as you may need to enter your computer log-in password and/or indicate you agree to various terms or licenses.
Terminal
brew install git-credential-managerStep 2: Introduce Yourself to Git
Git needs to know your name and email address because it records the author of each commit (ie, each “save state”). We’ll pass the --global option so you only ever need to do this once. At the Terminal, run the following but use your name and email address (not mine!).
Terminal
git config --global user.name "Dan Yavorsky"
git config --global user.email "dyavorsky@gmail.com"
You can check your info by running git config --global --list.
Lastly for this step – and we really shouldn’t need this, but we’ll do it just in case – but we want to ensure we use the branch name “main” instead of the depreciated branch name “master”. We can specify this with the setting:
Terminal
git config --global init.defaultBranch mainStep 3: Turn Git “On” for Your Website
At the Terminal, use cd to navigate to your website’s directory. Then initialize the directory as a Git repository (ie, turn Git “on” for your website) by running git init:
Terminal
git path/to/quarto_website
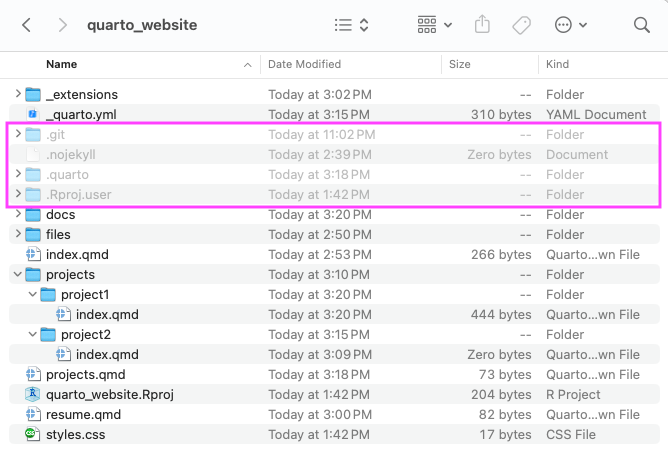
git initThis will create a hidden .git folder in the quarto_website directory. There’s no need to view this .git folder, but if you would like to, you may need to enable your file explorer or IDE to show hidden files:
- In the Mac Finder, toggle show/hide of hidden files with Cmd+Shift+.Cmd+Shift+.
- On Windows, use the search box on the Taskbar and type “show hidden files” and toggle the top result
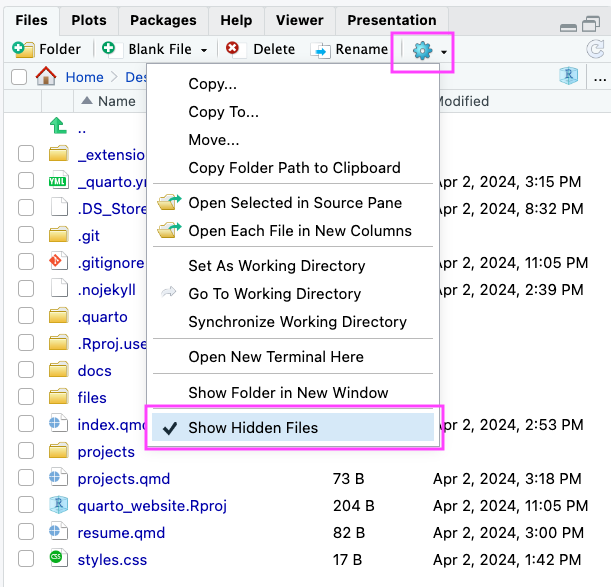
- In RStudio, select the gear icon in the Files tab and check the “Show Hidden Files” menu item
- In VS Code, you need to alter the “files.exclude” setting, see this
Step 4: “Save” Your Website
At this point, Git is now tracking your directory, but it hasn’t “saved” the history of your work. You create this history by taking snapshots of the state of your project at various times. These snapshots are called “commits”. Taking a snapshot is a two-step process: you first stage the files you want in your snapshot with git add and then you take the snapshot with git commit. All commits include a message.
You can take snapshots with helpful tools built into RStudio or VS Code, or you can use the command line in the Terminal.
In the Terminal, run the follow to stage all new or modified files and commit them:
Terminal
git add .
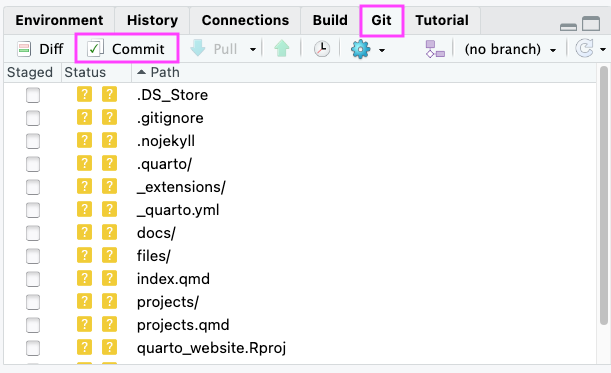
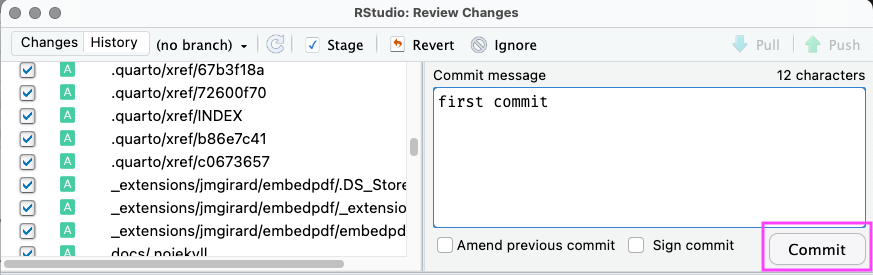
git commit -m "type a commit message in here"In RStudio, use the Git tab. Check the box to the left of each file to stage it, then click the little “Commit” button at the top of the tab. This pops up a window where you can enter your commit message. Then click the big “Commit” button to finalize your snapshot. Close the pop-up window.
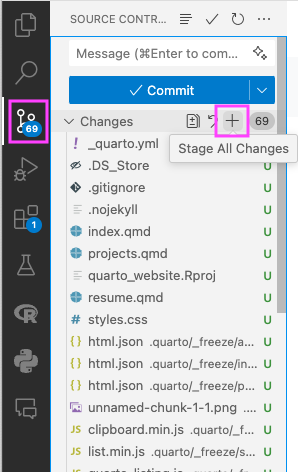
In VS Code, use the third-from-top button in the Activity Bar at the far-left of the application to access the Source Control panel. There you’ll find helpful buttons like the plus-sign button to stage all files, a text box to enter your commit message, and the big blue “Commit” button.
At this point, everything is all set locally on your machine. Next we head to GitHub.
Step 5: Create a GitHub Account
Go to github.com and sign up for a free account.
Pick a username that is short, lowercase, professional, and timeless. For example, dyavorsky is a good choice while cooldudeUCSD2026 is not.
Step 6: Create a GitHub Repository
Select the “Repositories” tab in GitHub (this is also accessible by clicking on your profile photo in the top-right corner).
The click the green “New” button on the top-right.
If you name your repository your_username.github.io, then your website will have the same thing as its URL, which is pretty nice. However, if you name your repository something like quarto_website, then your URL will be your_username.github.io/quarto_website. If you don’t like either of those URLs, you can always purchase a domain from a provider like GoDaddy. I did this so my URL would be www.danyavorsky.com instead of dyavorsky.github.io/quarto_website.
Once you create your repository, GitHub will helpfully list a bunch of terminal commands for you. Copy the 3-line command under the heading “…or push an existing repository from the command line”
Step 7: Connect your Local Directory to your GitHub Repo
In order to sync our local work with the new GitHub remote repository, we need to connect the two. Those 3 lines you just copied do the syncing. Paste/run those 3 lines in the Terminal:
Terminal
git remote add origin https://github.com/username/repo-name.git
git branch -M main
git push -u origin main- The first command indicates that we want to connect our local repository to a remote repository and use the shortname “origin” instead of the full URL going forward.
- The second command renames the current branch to “main”. This isn’t necessary for us, but here it does no harm, so we leave it in.
- The third command pushes the commit(s) from our local repository up to the remote repository.
Refresh the webpage in your browser of your GitHub repo and you should see all the files from your computer’s website directory copied up to the GitHub repo. Exciting stuff!
Step 8: Tell GitHub your Repo is a Website
In your website repo, click on “Settings” toward the top-right.
In the left-side menu, select “Pages”.
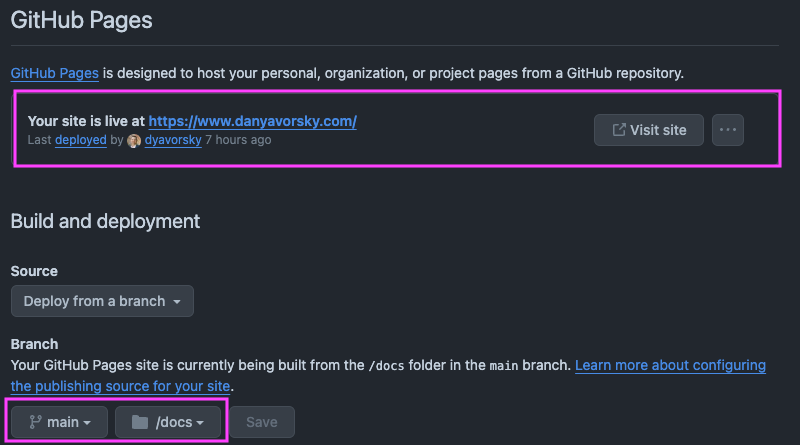
Under “Branch” in the middle of the page
- ensure the branch is “main” rather than “none”
- ensure the folder is “docs” rather than “(root)”
Have some patience and give GitHub a moment (usually only a minute or so) to host your site. GitHub will report “Your site is live” at the top of the page when it’s deployed. You man need to refresh the page to receive this message.
Step 9: Confirm Your Public Website
Enter the URL of your website in a browser or click the “Visit Site” button in GitHub to see your public website.
Workflow to Update Your Website
As you work on your website, your workflow will look something like this:
- frequently make changes to files (mostly .qmd files) or add new files (e.g. images)
- frequently render your website to see your edits
- occasionally stage and commit those changes
- infrequently push those commits to GitHub
For example, if I worked on something for 3 hours, I edit files constantly. I render every few minutes. I might make a commit once an hour or so. I may push my work just once at the end of those 3 hours.
Remember that the workflow provided in this tutorial requires you to render locally and then push everything in its final form to GitHub. I often make a local edit, forget to render, but commit that edit and push it to GitHub. Then I look at my website and wonder why the edit isn’t there. It’s because I edited the .qmd file, but since I didn’t render, the html file was never updated. Be sure to render locally before you commit and push!